The RMI, or Remote Method Invocation, is a set of Java classes that provides n-tier distributed object computing. A Java client can communicate with a server-side Java object, passing information to and from it. The RMI also provides a persistent connection to the server and manages the exchange of data with no special programming logic.
The RMI is designed conceptually in a similar manner to the Object Management Group's CORBA/IDL model. It allows an application to invoke various methods contained within another object running on a different virtual machine. Unlike CORBA/IDL, however, the RMI operates in a homogeneous environment, requiring that all distributed objects be written purely in Java.
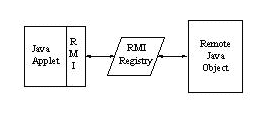
At a high level, the RMI is structured as follows:
The Java applet (known as the client object) interacts with the remote object (the server object). It does so by accessing a reference to the remote object through a device called the RMI registry.
The RMI registry is an application that runs as a background process on a remote server. It contains a table of named services and remote objects, serving as the communications gateway between the applet and the remote object.
The remote object also executes as a background process on the remote server and registers, or binds, itself to the RMI registry using a service name. The registry stores the remote object's service name and a reference to the remote object. (The reference is actually to the remote object's skeleton, which we will encounter very briefly later on.)
Finally, a Java applet (or application) loads the remote object's bindery from the RMI registry. It uses this to understand the structure of the remote object's method parameters. From this point on, the applet simply calls, or invokes, the remote object's methods as if they were local to it. All arguments are passed between the applet and remote object's methods using a technique called object serialization. (This section will not explain object serialization. For more details, refer to the information available through the Javasoft Web site.)
The steps involved in setting up a Remote Method Invocation are as follows:
Elsewhere in this Web site are examples of distributed applications using the Common Gateway Interface, the JDBC, network sockets, and CORBA's Interface Definition Language. In the following pages, we will learn how to create a persistent connection between a Java applet and a multi-user server-side JDBC application, using the RMI.
The examples which follow have been developed and tested with JDK 1.1.
If you are using JDK 1.1, the RMI is automatically installed with it. No further action is required to configure it.
In our earlier introduction to the JDBC, we learned how to create a Java application that accesses a relational database. We also determined the limits associated with the JDBC in a traditional client-server model. Two-tier designs place the database access within the client. Three- and n-tier designs distribute the database access to one or more middle layers running on another machine.
The Common Gateway Interface provides one method for delivering Java applications across the network. It follows a stateless, three-tier client-server model. The Sockets and CORBA/IDL sections of this Web site demonstrate how the traditional client-server model can also be extended to a persistent, distributed object architecture.
The RMI introduces another distributed object architecture within Java with many similarities to the other solutions:
Similarities:
The RMI's differences, however, separate it from the other distributed solutions as well:
Differences:
If you intend to develop a 100% pure Java solution using distributed objects, the RMI is a practical alternative for you. The performance tradeoff experienced with the RMI will improve with the use of JIT compilers.
In order to illustrate a distributed computing model using the RMI, as well as its ability to provide persistency in Internet computing, we will build a simple application using the JDBC. If you are new to the JDBC, then refer to the Java Database Connection section of this site for a quick overview. (This same application is shown in the Sockets and CORBA/IDL sections for comparison purposes.)
In our example, the applet will appear and function as follows*:
|
1, Nancy Davolio, Sales Representative 2, Andrew Fuller, Vice President, Sales 3, Janet Leverling, Sales Representative 4, Margaret Peacock, Sales Representative 5, Steven Buchanan, Sales Manager 6, Michael Suyama, Sales Representative 7, Robert King, Sales Representative 8, Laura Callahan, Inside Sales Coordinator 9, Anne Dodsworth, Sales Representative |
*Note: This applet simulates the process that will be used to provide JDBC access through the RMI. It is included here only to demonstrate the concepts and does not contain the full implementation of the RMI.
Upon initial load, the applet will connect to the Microsoft Access 7.0 sample database, Northwind. When the "Begin Search" button is pressed, it will perform a search that returns and displays all employee names and titles from the Employee table. When the "Clear Data" button is pressed, it will clear the search results from the applet. The database connection remains open until the applet is closed and terminated (i.e. shut down).
Key success factors of the process include:
As stated in the overview, we determined that there were three components needed to build an RMI process:
Similar to the Sockets and CORBA/IDL examples, the RMI allows an applet to communicate with one instance of a particular remote object that was previously registered on the Web server's RMI registry. Because we need to provide multiuser database support, we will add this capability to our JDBC access. We'll refer to this as our JDBC/RMI Connection Object.
Let's begin building our RMI process by starting with the JDBC/RMI Connection Object.
The first step we will take in building our RMI process is in the creation of a connection object. This object will be used to provide multi-user access to our database.
Remember, this process will illustrate JDBC access through the RMI. For this reason, we will establish a naming convention such that all classes will begin with "JR", with the J representing the JDBC, and the R representing the RMI.
Let's start by importing the JDBC:
  import java.sql.*;
  public class JRConnection {
|
     private Connection con;         // Database connection object
     private Statement stmt;         // SQL statement object
     private ResultSet rs;           // SQL query results
|
     /** Default constructor */
     public JRConnection() {
         // initialize the database objects
         rs = null;
         stmt = null;
         con = null;
} |
     /** Open a database connection */
     public void openDatabase() throws SQLException, ClassNotFoundException {

         // Load the JDBC-ODBC bridge driver
         Class.forName ("sun.jdbc.odbc.JdbcOdbcDriver");

         // Connect to the database
         con = DriverManager.getConnection("jdbc:odbc:Northwind", "admin", "");
     }

     /** Issue a SQL query with a WHERE clause */
     public void performSearch() throws SQLException {

         String query;           // SQL select string

         // build the query command
         query = "SELECT EmployeeID, LastName, FirstName, Title " +
                 "FROM Employees";

         stmt = con.createStatement();
         rs = stmt.executeQuery(query);
     }

     /** Fetch the next row in the result set, returning null when done */
     public String getNextRow() throws SQLException {
         if (rs.next()) {
             return rs.getInt("EmployeeId") + ", "
                  + rs.getString("FirstName") + " "
                  + rs.getString("LastName") + ", "
                  + rs.getString("Title");
         }

         // end of result set; close the search
         rs.close();
         rs = null;
         stmt.close();
         stmt = null;
         return null;
     }

     /** Close the database connection and any remaining open objects
     public void closeDatabase() throws SQLException {
         if (rs != null)
             rs.close();

         if (stmt != null)
             stmt.close();

         if (con != null)
             con.close();

         rs = null;
         stmt = null;
         con = null;
} |
As we see by the above, four primary methods will be used to access the database: openDatabase(), performSearch(), getNextRow(), and closeDatabase(). These methods will be used as we continue to build our RMI process.
javac JRConnection.java |
The RMI process begins with an interface that defines the methods accessible to the RMI client. As with all other abstract classes, the interface serves only to define the remote object's methods and parameters; they do not contain any actual programming logic.
Within our JRConnection class, we created four public methods used to provide database process. Each of these methods will be used in the creation of the remote interface.
Since we are using the JDBC and RMI, we will import both packages and create JR as a subclass of Remote:
  import java.rmi.*;
  import java.sql.*;
  public interface JR extends java.rmi.Remote {
|
     public int openDatabase()
                throws RemoteException, SQLException, ClassNotFoundException;

     public void performSearch(int id)
                throws RemoteException, SQLException;

     public String getNextRow(int id) throws RemoteException, SQLException;

public void closeDatabase(int id) throws RemoteException, SQLException; |
These methods correspond to the four methods we created in JRConnection. In addition to the exceptions thrown by JRConnection, the interface must declare that these methods throw RemoteException, since they will also be contained within a remote object. RemoteException is thrown if an error occurs during the attempt to call a remote method.
You may have noticed that with the exception of openDatabase(), each method is passed an integer ID. When we construct the remote object definition, we will add a parameter that represents the process ID associated with a given database connection. The openDatabase() method will be defined by the remote object to return the process ID when a connection is made. A -1 value will indicate that the maximum number of connection attempts has been exceeded.
javac JR.java |
After the creation of the remote interface, we continue by building the actual remote object. The remote object implements the interface and incorporates the program code that will be run when its methods are called. This object performs the actual execution process, or invocation, of the RMI.
Remember that we are building a multi-user database connection process. Keeping this in mind, we will not only construct the remote object, but also perform the task management of the multiple connections.
The remote object definition begins by importing the necessary packages and implementing the remote interface that was previously created. In addition, the object is a subclass of UnicastRemoteObject (contained within the java.rmi.server package), which defines it as a remote object.
import java.sql.*;
import java.rmi.*;
import java.rmi.server.UnicastRemoteObject;
public class JRImpl extends UnicastRemoteObject implements JR {
|
Because we will actually be managing multiple database connections, we will define a private array that will contain a link to each connection as it is created. Up to 5 instances of the JRConnection object will be allowed.
private JRConnection jrc [] = new JRConnection [5]; |
The RMI requires that every remote object contain one of the following:
We will implement the first of the two conditions:
  /** Default constructor */
  public JRImpl () throws RemoteException {  }
|
It is now time to create the remote methods that will be called by the client. These methods implement the same names and parameters that were previously declared in the remote interface. As we develop these methods, note that the appropriate logic is included for our multi-user support requirement, with calls directed to the methods contained within the JRConnection class.
Note: The openDatabase() method is synchronized in order to prevent multiple concurrent client calls from competing with each other as they create a new reference within the connection table.
/** Method to open a database connection */
public synchronized int openDatabase()
    throws RemoteException, SQLException, ClassNotFoundException {
    int connectionId;

    // Loop through connection table until an empty slot is found
    for (connectionId = 0; connectionId < jrc.length; connectionId++) {
        if (jrc [connectionId] == null)
            break;
    }

    // If no empty slots found, generate an error
    if (connectionId >= jrc.length) {
        System.out.println("Out of connections.");
        return -1;
    }

    // Create a connection for the new process and run it
    jrc [connectionId] = new JRConnection();

    // Call the new process's method to open a database connection
    jrc[connectionId].openDatabase();

    // return the connection identifier
    return connectionId;
}

/** Issue a SQL query with a WHERE clause */
public void performSearch(int id)
    throws RemoteException, SQLException {

    jrc[id].performSearch();
}

/** Fetch the next row from the current query result */
public String getNextRow(int id) throws RemoteException, SQLException {

    return jrc[id].getNextRow();
}

/** Close the database connection */
public void closeDatabase(int id) throws RemoteException, SQLException {

    jrc[id].closeDatabase();
    jrc[id] = null;
} |
javac JRImpl.java |
When parameters are sent between the client and remote objects, they are passed using a technique called object serialization. The marshalling of parameters between the client and server objects is controlled by the remote object's stub and skeleton. According to Sun Microsystem's RMI Tutorial, "a reference to a remote object is actually a reference to a stub. A stub is a client-side proxy for a remote object which forwards RMI calls to the server-side skeleton, which in turn forwards the call to the actual remote object implementation."
What this boils down to is this: you need to run an extra command, rmic, against the compiled remote object in order to create the necessary stub and skeleton classes:
rmic JRImpl |
This command generates two additional class files, representing the stub and skeleton for the remote object: JRImpl_Stub.class and JRImpl_Skel.class. As we proceed, we must make sure the stub object, JRImpl_stub, is available in the client's and server's respective CLASSPATH. Similarly, the skeleton object, JRImpl_skel, must be available in the server's CLASSPATH.
Note: If our remote object were contained within a package, we must specify the package name as part of the rmic command. If, for example, the JRImpl object were contained as part of package MyPkg, the command would look like the following:
rmic MyPkg.JRImpl |
The remote object that we just created will be used within a background process running on the Web server. It represents the "server" side of the "distributed" computing model. The "client" side can be constructed either as a Java application or as an applet. Although we will use an applet in our demonstration, let's quickly explore the security aspects required by the RMI for applications and applets alike.
A security manager must be installed in order to preserve the integrity and sensitivity of the remote objects, similar to the security built into commercial browsers for Java applets. The security manager may be one that you build yourself, or the one that comes delivered with the RMI: RMISecurityManager. If you are creating a client in the form of a Java application, you need to invoke the security manager as follows prior to interacting with the RMI:
System.setSecurityManager(new RMISecurityManager()); |
Since we will be creating an applet, it has its own built-in security manager, which is sufficient and automatically recognized by the RMI. For this reason, there is no need to explicitly load the RMI security manager within an applet.
Now let's move on to the creation of our RMI applet.
The sample code below will only illustrate the logic necessary for the applet to use the RMI. The complete set of source code for the applet is available in The Complete JDBC/RMI Example later on.
The applet begins by importing the appropriate RMI packages and creating an reference to the remote object through its interface (JR). Once it establishes this link, it can proceed to call the remote object's methods as if they were locally available to the applet.
import java.rmi.*;
import java.rmi.registry.*;

public class JRApplet extends Applet
                      implements ActionListener {

   int connectionId;  // process ID for this connection
   JR  rmtobj;    // remote object's interface

   /** Initialize the applet and remote object */
   public void init() {

       // obtain a reference to the remote object through its interface
       try {
           // get the host name where the applet was loaded
           String  registryName = "//" + getCodeBase().getHost() + "/";

           // append the name of the remote object within the registry
           registryName += "jdbcrmi";

           // obtain a reference to the remote object
           rmtobj = (JR)Naming.lookup(registryName);
       } catch (Exception e) {
           showStatus("Cannot connect to RMI registry for jdbcrmi");
           return;
       }

       // open a database connection, receiving the process ID
       try {
           connectionId = rmtobj.openDatabase();
           if (connectionId == -1) {
               searchResults.addItem("Cannot open database connection.");
           }
       } catch (Exception ex) {
                        searchResults.addItem("Cannot open database connection.");
       }
   }

   /** close the remote connection if the applet is terminated */
   public void finalize() {
       try {
           rmtobj.closeDatabase(connectionId);
       } catch (Exception ex) {}
   }

   /** Issue a SQL query with a WHERE clause */
   public void performSearch() throws Exception {

       // issue the database search
       rmtobj.performSearch(connectionId);

       // process the results of the search
       result = rmtobj.getNextRow(connectionId);
       while (result != null) {
           // do whatever you want to the result here...
           result = rmtobj.getNextRow(connectionId);
       }
   }
}
|
Notice by the above example that the rmtobj object references the remote object running on the server. This is done by accessing the object's registry name, jdbcrmi (which we will learn how to set when we bring it all together). All subsequent calls to the remote object's methods are performed via our rmtobj reference, no different than if the object were local to the applet.
javac JRApplet.java |
At this point we have created the following classes and interfaces:
Based on what we've seen so far, JRApplet loads information about the remote object from the RMI registry and invokes its methods through its interface. What exactly is the registry, and how does it work?
With all distributed computing architectures, a service is offered on a machine using special software called a server. This service can either actively broadcast itself over the network (such as Novell Netware), or it can wait passively on the server until someone requests services from it (such as a Web server). The RMI operates using the latter approach. Here's how:
A background process, known as the RMI registry, is initiated on the server. This is a Java application which contains an internal table of remote object references. For each remote object, the table contains a registry name for it, and an instance of that actual object. Multiple instances can be stored for the same object simply by instantiating and binding it multiple times to the registry using different names.
The registry offers its service through TCP port 1099 on the current host. It is through this port that the client is actually able to communicate with the remote object. If you wish to override this default port number, you can do so when you start the registry.
When the RMI client connects to the registry, it receives a reference to the instantiated object through its interface and communicates with it through its skeleton. This same reference is accessible by all clients, therefore any variables and methods contained within the remote object are shared.
When we created our JDBC process through the RMI, we built into it a multi-user capability. When we register the remote object within the registry, a single instance of the object is shared by all clients that need to access it. If we don't create multiple connection objects with our JDBC calls, everyone will access the same database connection and overwrite each other's instance variables. By spawning a new object for each new connection, all clients can operate independently of each other. This is the purpose of our JRConnection object.
Okay, let's bring everything together now.
As noted above, we need to bind the remote object to the RMI registry. Let's build a small Java application, called JRStart, whose role is to do just this:
import java.rmi.*;
public class JRStart {
   public static void main(String args[]) {
       System.out.println("Starting JDBCRMI...");
       // Create and install the security manager
       System.setSecurityManager(new RMISecurityManager());
       try {
           JRImpl servlet = new JRImpl ();
           Naming.bind("jdbcrmi", servlet);
           System.out.println("JDBCRMI is started.");
       } catch (Exception e) {
           System.out.println("JRImpl.main: an exception occurred: " +
               e.getMessage());
           e.printStackTrace();
       }
   }
}
|
First, you see that RMISecurityManager is installed as the security manager for the remote object. This is done to ensure the integrity and security of the object.
Next, we instantiate the implementation of the remote object, JRImpl.
Finally, we invoke the Naming.bind() method. This step automatically inserts a reference to the object into the registry through its skeleton. The object is registered with the name we assign it (jdbcrmi). The fully qualified name takes the form of a URL:
rmi://hostname:port/name |
If the hostname and port are left out, the registry name defaults to the current host and registry port. If you start the registry on a non-default port number, you must make sure the proper port number is registered with the remote object. (Remember also to make the same change within the applet when it calls Naming.lookup()).
javac JRStart |
The RMI registry needs to be executed as a background process. In Windows 95/NT, do this as follows:
start rmiregistry |
If you wish to start the registry on a port other than the default (e.g. 8099), do the following:
start rmiregistry 8099 |
In Solaris, do the following (the first example uses the default port, and the second uses port 8099):
rmiregistry & |
rmiregistry 8099 & |
Similar to the RMI Registry, the remote object must be loaded within a background process. This is done by running the registration program in the background, similar to the way we started the registry:
rem Windows 95/NT start java JRStart |
# Sun Solaris java JRStart & |
Run the applet now, and you are ready to go!
appletviewer jr.html |
(The jr.html document contains an <APPLET> tag to run JRApplet.)
The complete source code for each of the objects created in our JDBC/RMI example is available through the links listed below. You may save each of these objects or copy/paste the code into files on your hard disk and experiment with them. Good luck with your own RMI applications!
The object that connects to a database using the JDBC, allowing multi-user access.
The remote object interface.
The remote object.
The RMI client.
The remote object's registration into the RMI registry.